Hurricane Roof Preparation Checklist: Protect Your Home Before and After the Storm
If you own a home in South Florida, hurricane season is just part of life, meaning it’s time to look into hurricane roof preparation. Every year, like clockwork, from June 1 to November 30, the Atlantic basin spins up dozens of named storms, and a handful of those make their way close enough to South Florida to cause real damage.
Sometimes catastrophic damage. According to the National Hurricane Center, South Florida is one of the most hurricane-vulnerable regions in the entire United States, with Miami-Dade, Broward, and Palm Beach counties all sitting in high-frequency strike zones.
The good news is that most serious roof damage during hurricanes is preventable, or at least significantly reducible with the right preparation. The bad news is that most homeowners wait until a storm is already named and tracked before they even think about their roof. By then, roofers are booked out, hardware stores are emptied, and your options narrow considerably.
This guide is your comprehensive checklist for hurricane roof preparation. From what to do well before a storm threatens, what to do in the final days before landfall, how to document damage properly after the storm passes, and when a situation calls for emergency professional help. Whether you’re a long-time South Florida homeowner or new to the region, this is the kind of information that genuinely protects your home and your finances.
Schedule a pre-season roof inspection before hurricane season hits
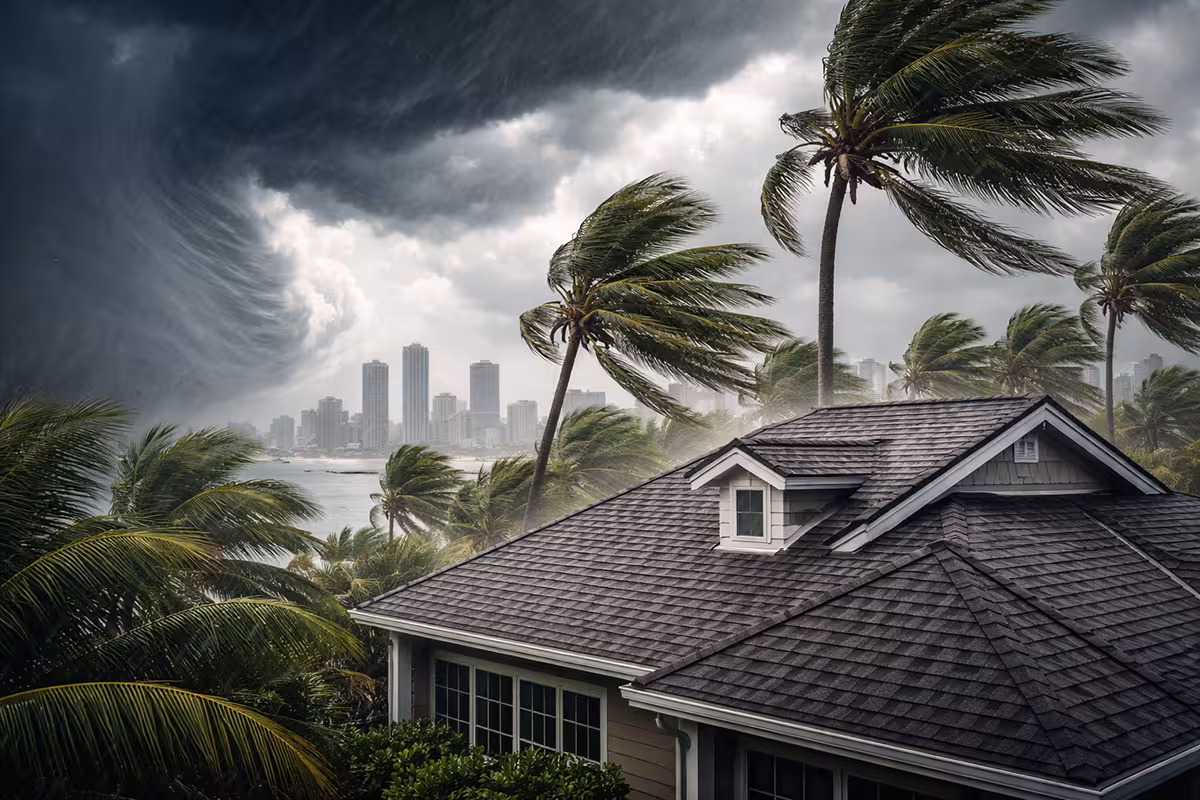
Your Roof Is Your Home’s Most Vulnerable Point During a Hurricane
It might seem obvious, but it’s worth saying clearly: your roof is the single most exposed structural element of your home during a hurricane. It faces the full force of wind uplift, wind-driven rain, flying debris, and in some cases, direct impact from storm surge in coastal areas. When a roof fails during a storm, even partially, the consequences pile up quickly.
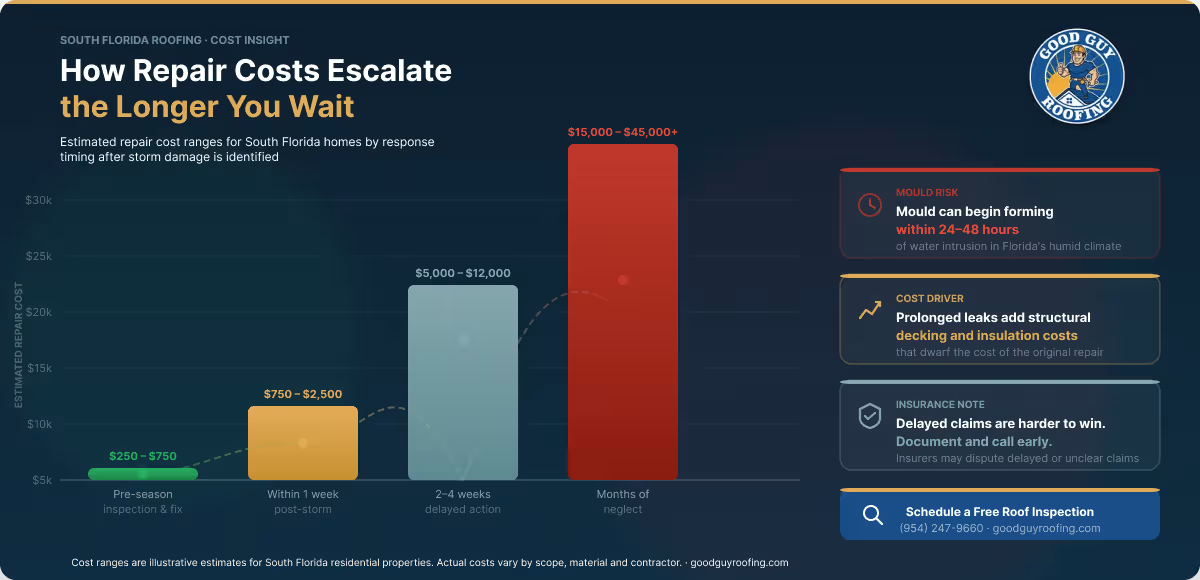
Water intrudes, ceilings collapse, insulation becomes soaked, mould starts to build up within 24 to 48 hours, and structural integrity can be compromised in ways that are expensive and time-consuming to repair.
In fact, roof failures cause the majority of hurricane-related property losses in the United States. The mechanism is usually wind uplift, the same aerodynamic force that lifts an airplane, which creates negative pressure above the roof surface and can literally pull the roof covering off the structure if the attachment isn’t up to code.
Florida’s building codes, particularly in Miami-Dade County, which has the most stringent residential wind standards in the country, have improved dramatically since Hurricane Andrew in 1992.
But even a code-compliant roof needs active maintenance and pre-season preparation to perform at its rated capacity. An ageing sealant, a few loose flashing points, or a handful of lifted tiles are all it takes to give a Category 2 storm a foothold.
Your roof doesn’t protect itself. That’s your job, and it starts well before any storm forms.
The Complete Hurricane Roof Preparation Checklist
The checklist below is organized by timing: what to do months before the season, what to do in the weeks leading up to a forecast storm, and what to do in the immediate days before landfall. Each section contains the specific actions that make the most meaningful difference. Don’t treat this as a skim-once list; treat it as a working document you return to every year.
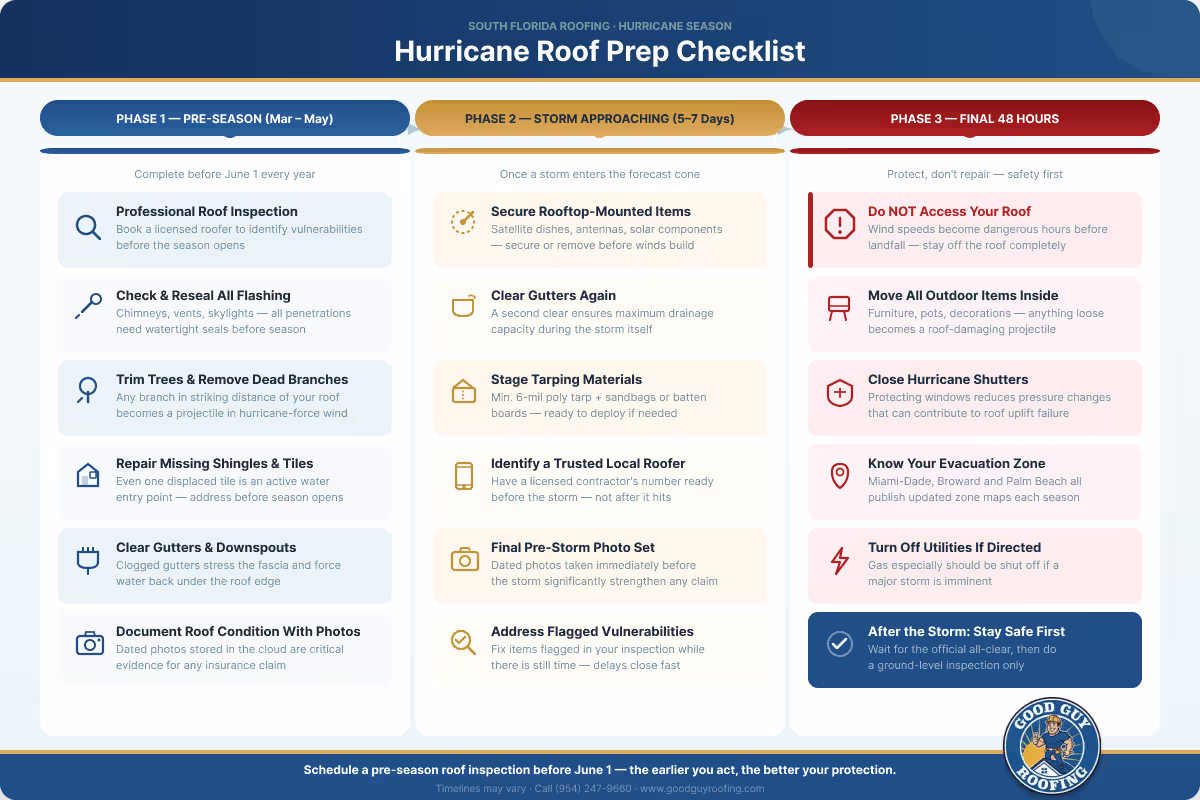
Phase 1: Pre-Season Hurrican Roof Preparation (March – May)
This is the most important phase, and, ironically, the most neglected. Everything that happens here gives you time to find and fix problems before they become emergencies, time to get on a roofer’s schedule before it fills up, and time to make informed decisions rather than panicked ones. Ideally, you’d want to complete this phase by the end of May, every year without exception.
| Pre-Season Roof Checklist, To Complete by End of May | |
| □ | Schedule a professional roof inspection. This is the single most valuable thing you can do. A licensed roofing contractor can identify vulnerabilities, loose tiles, deteriorating underlayment, compromised flashing, and cracked sealants that are invisible from the ground. An inspection now costs a fraction of what emergency repair costs after a storm. |
| □ | Check and reseal all flashing. Flashing around chimneys, skylights, vents, and roof penetrations is one of the most common failure points. Look for rust, gaps, or sections that have pulled away from the surface. If in doubt, have a professional re-seal. |
| □ | Inspect and replace damaged or missing shingles or tiles. Even a single displaced tile creates an opening. Walk around your property after the winter season and look for signs of displacement, cracking, or granule loss in gutters, a sign that asphalt shingles are degrading. |
| □ | Clear all gutters and downspouts. Clogged gutters don’t just back up water; during a hurricane, they add weight to your fascia, can pull away from the structure, and force water under your roof’s edge. Clean thoroughly and check that all downspouts are directing water away from the foundation. |
| □ | Trim trees and remove dead branches. Dead or overhanging branches are projectiles in a hurricane. Any branch within striking distance of your roof should be cut back or removed entirely. This is best done by a certified arborist, especially for large or mature trees near the structure. |
| □ | Check your attic ventilation. Proper attic ventilation reduces heat buildup that can degrade roofing materials over time, and it equalizes pressure during a storm. Blocked soffit vents are a common, easy-to-miss issue. |
| □ | Review your homeowner’s insurance policy. Know exactly what your policy covers before a storm, not after. In Florida, wind and hurricane coverage is often separate from the standard policy. Confirm your coverage limits, your deductible (many Florida policies have a percentage-based hurricane deductible), and whether you’re covered for temporary repair costs. |
| □ | Document your roof’s current condition. Take dated photographs of your roof from all accessible angles. Store these in a cloud-based folder, not just on your phone. If you file an insurance claim after a storm, having pre-storm documentation is invaluable. |
| □ | Check the age and condition of your underlayment. This is the secondary water barrier beneath your shingles or tiles. In Florida’s climate, underlayment can degrade faster than expected. A roofer can advise whether it needs reinforcing or replacing. |
| □ | Verify your roof meets current Florida Building Code standards. If your roof was installed before 2002 in Miami-Dade County, or before 2004 statewide, it may predate current wind resistance requirements. Ask a contractor to assess whether a wind mitigation inspection is warranted. |
Phase 2: When a Storm Is Forecast (5–7 Days Out)
Once a storm enters the forecast cone for South Florida, the window for meaningful preparation decreases fast. If you’ve completed Phase 1, you’re already in a much stronger position. This phase is about taking targeted protective action based on your roof’s specific condition and the projected storm severity.
| Storm Approach Checklist, 5 to 7 Days Before | |
| □ | Revisit any known vulnerabilities from your inspection. If your pre-season inspection flagged any watch items, now is the time to address them. Don’t wait for the 48-hour window. |
| □ | Secure or remove all rooftop-mounted items. Satellite dishes, solar water heater components, decorative weathervanes, and external antenna mounts all become wind-borne hazards if they’re not properly secured. Remove what you can; secure what you can’t. |
| □ | Check and secure roof-to-wall connections if accessible from the attic. Hurricane straps or clips that connect the roof structure to the wall framing are critical. A contractor can verify these are intact if your attic is accessible. |
| □ | Clear gutters again. A second gutter clear before a storm ensures maximum drainage capacity during the storm. Leaves and debris accumulate quickly, especially if you trimmed vegetation in Phase 1. |
| □ | Purchase and stage tarping materials. Have at least one heavy-duty poly tarp (minimum 6 mil thickness) of appropriate size, along with sandbags or batten boards to secure it. If your roof is damaged during the storm, you’ll need to act quickly to prevent further water intrusion before professional help arrives. |
| □ | Photograph your roof one final time. A dated “immediately before the storm” photo set strengthens any subsequent insurance claim significantly. |
| □ | Identify a trusted emergency roofing contractor. Have the number ready before the storm hits. After a major storm, unscrupulous contractors flood affected areas. Having a relationship with a licensed, local roofer before disaster strikes means you’re less likely to be victimized by storm chasers. |
Phase 3: Final 24–48 Hours Before Landfall
At this point, you should be focused on personal safety and final property protection, not climbing onto a roof. This phase is brief and targeted.
| Final Pre-Landfall Checklist, 24 to 48 Hours Before | |
| □ | Do not attempt to access your roof. Wind conditions can become dangerous well before a storm makes landfall. If there are unresolved roof issues at this stage, accept that they’ll need to be addressed post-storm. Your safety is the priority. |
| □ | Move outdoor furniture, decorations, and loose items inside or to a garage. These become roof-damaging projectiles in sustained winds above 40 mph, which can occur hours before a storm’s centre arrives. |
| □ | Close and secure hurricane shutters or impact-resistant storm panels. Protecting windows reduces the risk of pressure changes inside the home that can contribute to roof uplift. |
| □ | Know your evacuation zone and plan. Miami-Dade, Broward, and Palm Beach counties all publish updated evacuation zone maps each season. Know yours. In a major storm, staying in an evacuation zone is never worth the risk to your life. |
| □ | Turn off utilities if directed by local authorities. Gas in particular should be shut off if a major storm is imminent. |
Not sure if your roof is ready for hurricane season? Schedule a pre-season roof inspection
After the Storm: Damage Assessment and Documentation
Once the storm has passed and local authorities have confirmed it’s safe to move about, your first priority is assessing your home for damage. This needs to be done carefully, systematically, and with good documentation, especially if you intend to file an insurance claim.
Stay Safe Before You Inspect
Before you walk outside to look at your roof, make sure the storm has fully passed, not just the eye wall. The back half of a hurricane can be just as dangerous as the front. Watch your local news, monitor the National Hurricane Center’s updates, and wait for an official all-clear from local emergency management.
Once outside, scan for hazards before approaching your home: downed power lines (treat every downed line as live), structural damage to neighbouring structures, pooled water that may be concealing debris, and unstable trees. Do not climb onto your roof under any circumstances immediately after a storm. Water-saturated roofing surfaces are extremely slippery, structural integrity may be compromised, and the risk of a fall is significant.
Conducting a Ground-Level Inspection
A thorough ground-level inspection can reveal a surprising amount of information. Walk the entire perimeter of your home and look for:
- Missing, cracked, or displaced shingles or tiles. Even a small bare patch is an active entry point for water.
- Exposed underlayment or decking. If you can see the dark felt or wood beneath the roofing material, water has already entered or is about to.
- Dented or bent flashing. Metal flashing around chimneys, vents, and roof edges can be deformed by debris impact even when the underlying roof appears intact.
- Sagging or bowing sections. Any area of the roof that appears to have changed shape is a sign of structural loading, possibly from debris accumulation or water saturation.
- Debris impact points. Branches, roof tiles from neighbouring properties, and other debris leave characteristic dent or puncture patterns.
- Gutter and fascia damage. Gutters pulled away from the fascia or fascia boards that are cracked or separated indicate stress on the roof edge.
Documenting Damage Thoroughly
Documentation is the foundation of a successful insurance claim. The more specific and visual your evidence, the stronger your position when dealing with your insurer. Take a systematic approach:
- Photograph everything before any cleanup. Wide shots provide context; close-ups show detail. Capture the damage from multiple angles.
- Note the date and time of each photo. Smartphone cameras do this automatically, but confirm your phone’s clock and location services are active.
- Record a narrated video walkthrough. A continuous video with verbal commentary, “this is the south-facing slope, there are three missing tiles here, and what appears to be exposed underlayment near the ridge”, is often more compelling than individual photographs.
- Identify and document interior damage. Water stains on ceilings, damp insulation in the attic, or water marks on walls should all be photographed as well, with their location within the home noted.
- Keep records of all emergency expenses. If you purchase tarping materials, rent equipment, or pay for emergency services, retain all receipts. Many policies cover emergency mitigation costs.
- Do not throw away damaged materials before your insurer has inspected them. This is a common and costly mistake. Keep damaged shingles, tiles, or sections of flashing in a labelled bag until your claim is closed.
| Filing a Claim: What to Expect
After documenting damage, contact your insurance company to file a claim as quickly as possible. Insurers often process claims in the order they’re received after a major event, and delays can extend your wait significantly. An adjuster will be assigned to inspect the damage, often within one to two weeks of a major storm. Having a licensed roofer present during the adjuster’s visit is your right and can be extremely beneficial. A professional can identify and articulate damage in technical terms that an adjuster may miss or undervalue. |
| Need Storm Damage Documentation Help? Ask us, we work with homeowners and insurers | Call (954) 247-9660 |
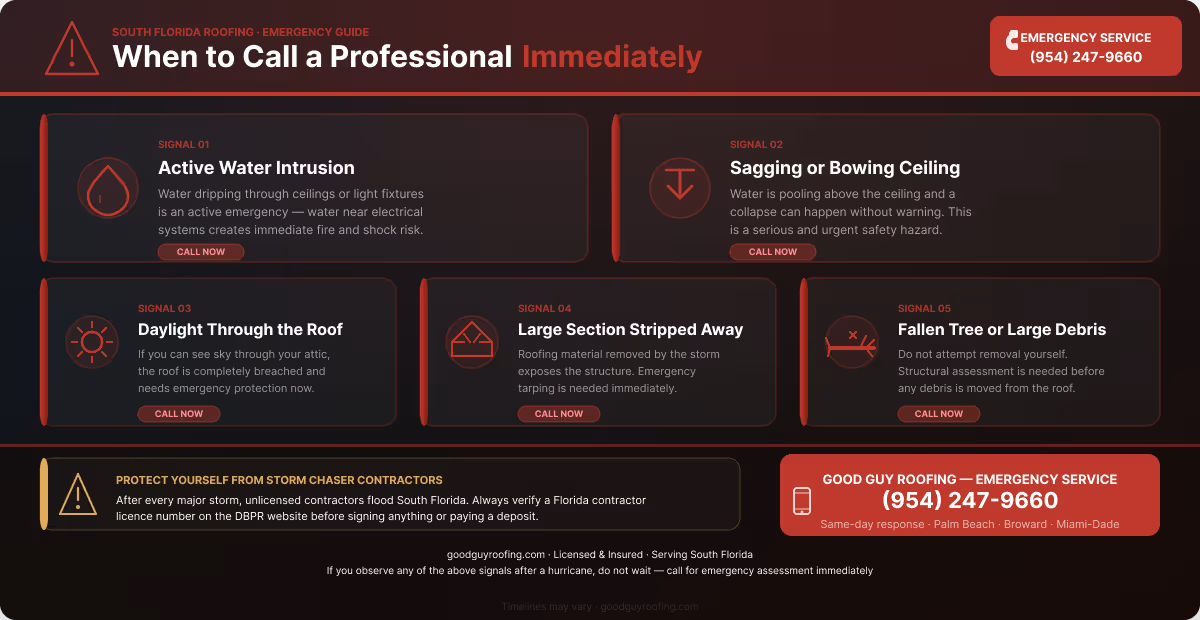
When to Call a Professional Immediately
There’s a meaningful difference between minor storm damage that you can document and monitor until your scheduled contractor appointment and situations that require immediate professional intervention. Knowing the difference protects both your home and your safety.
Call for emergency roofing service if you observe any of the following:
- Active water intrusion into the living space. Water dripping through ceilings or light fixtures is an active emergency, not because of the water itself, but because water near electrical systems creates fire and electrocution risks.
- Sagging or bowing ceiling. A ceiling that has changed shape is accumulating water above it. A ceiling collapse can happen without warning and is a serious safety hazard.
- Visible sky through the roof structure. If you can see daylight through your attic, the roof has been breached completely. This requires immediate temporary protection.
- A section of roofing material has been completely removed by the storm. Missing roofing over any area larger than a few tiles leaves the structure exposed and needs emergency attention.
- Fallen trees or large debris on the roof. Do not attempt to remove these yourself. Structural assessment is needed before any debris removal to ensure the roof can bear movement without further collapse.
| Protect Yourself from Storm Chaser Contractors
After every major hurricane in South Florida, out-of-state contractors descend on affected communities, often making door-to-door visits offering quick, cheap repairs. Many are unlicensed, uninsured, and will take a deposit and disappear. Before you engage any contractor after a storm, verify their Florida contractor’s license number on the Florida Department of Business and Professional Regulation (DBPR) website, confirm they are based locally, and never pay more than a small deposit upfront. A reputable contractor will never pressure you to sign anything on the spot. |
Frequently Asked Questions
How do I know if my roof has storm damage?
Not all storm damage is obvious, and some of the most damaging types are invisible from the ground. The clearest visible signs are missing, cracked, or displaced shingles and tiles; exposed underlayment or decking; dented or lifted flashing; and visible debris impact marks. Inside your home, look for new water stains on ceilings or walls, damp spots in your attic after rain, or an unexplained musty smell that wasn’t present before the storm. Because much of the meaningful damage occurs at the fastener and underlayment level, not just on the surface, a professional inspection after any significant storm is always the most reliable way to get a complete picture.
Should I cover roof damage with a tarp?
Yes, temporary tarping is an important step if your roof has been breached and you’re waiting for permanent repairs. The key is doing it correctly. The tarp must be large enough to extend over the ridge of the affected area, and it needs to be secured firmly, not just weighted down loosely. If the damage is more than a small area, or if there is any concern about structural integrity, it’s safer to call a professional for emergency tarping rather than attempting it yourself. Improper tarping can cause additional damage and may complicate your insurance claim.
How soon should I schedule an inspection after a hurricane?
As soon as it’s safe to do so, ideally within the first week after the storm. This is important for two reasons. First, delay means continued exposure to the elements if there is any damage, even minor, that hasn’t been identified yet. Second, insurance companies generally want damage documented promptly, and extended delays can complicate or reduce the value of a claim. After a major storm event across South Florida, roofing contractors become extremely busy, and calling early puts you ahead of the queue. Good Guy Roofing prioritizes post-storm inspection scheduling for homeowners across Palm Beach, Broward, and Miami-Dade counties.
What roof damage is covered by insurance?
In Florida, most homeowner’s insurance policies cover sudden, accidental damage caused by a covered peril, which typically includes wind and windstorm (hurricane) damage. However, damage caused by neglect or pre-existing deterioration is generally not covered. This is why the pre-season documentation step is so important: it establishes a baseline that makes it clear which damage was caused by the storm and which was pre-existing. Florida policies often have a separate, higher hurricane deductible, typically 2% to 5% of your dwelling coverage, rather than a flat dollar deductible. Read your policy carefully, and consider consulting with a licensed public adjuster if you feel an insurer’s assessment is significantly lower than the actual damage.
How can I prevent roof leaks during storms?
Prevention starts with the pre-season steps in this guide: professional inspection, flashing maintenance, shingle or tile repair, clear gutters, and tree trimming. Beyond that, the most effective long-term protection for South Florida homes is ensuring your roof meets current Florida Building Code wind resistance requirements, including the required secondary water barrier (underlayment) in High Velocity Hurricane Zones.
Don’t Wait for a Storm Warning to Think About Your Roof
The checklist in this guide covers everything from the first pre-season inspection to emergency post-storm response. But the most important takeaway is simple: the earlier you act, the better your outcomes. A roof that has been professionally inspected, maintained, and documented before the season starts is a roof that is ready for whatever the Atlantic sends your way.
Good Guy Roofing serves homeowners across Palm Beach County, Broward County, and Miami-Dade County with pre-season inspections, post-storm assessments, emergency tarping, and full roof replacements. We’re local, licensed, insured, and familiar with every aspect of Florida’s building codes and insurance requirements.


