South Florida Roof Maintenance: A Season‑by‑Season Checklist to Prevent Leaks
Most roofs in South Florida don’t fail overnight. Instead, they break down slowly—a dried-out sealant from two summers ago, a flashing lifted by the last storm, or a gutter blocked since the rainy season began. None of these seem urgent. None demand immediate action. But one afternoon, during a summer squall, water suddenly leaks through the ceiling.
The frustrating part? You can prevent almost all of it. With a few timely tasks each year, you can protect your roof. Florida’s climate follows predictable patterns, making it easy to build a maintenance routine. Stick to it, and your roof will last longer, withstand storms better, and save you hassle.
This guide offers a practical, season-by-season checklist tailored for South Florida—not a one-size-fits-all national plan. You can handle some tasks yourself from the ground or a ladder. Others require a professional. We’ll make it clear which is which.
Why South Florida Is a Different Maintenance Environment
Before we dive into the checklist, let’s clarify what your roof faces here- challenges that truly set South Florida apart from the rest of the country.
Florida roofs battle year-round UV radiation, which breaks down organic materials faster than almost anywhere else in the U.S. Persistent humidity seeps into every gap and failed sealant. From June through November, hurricane season brings six months of elevated wind risk, while the rainy season can drop an inch of rain in just 20 minutes. If you live near the coast, salt air accelerates corrosion on any exposed metal.
As a result, you need to perform maintenance more often than in other climates. Sealants that last five years in the Northeast might only last two or three years here. In temperate areas, you clear gutters once a year; in South Florida, you should do it twice, before and after the rainy season.
Florida’s climate creates a natural maintenance calendar. Here, rain and storms, not temperature, define the seasons. This gives you a clear structure for organizing your roof care.
Pre-Season: March – May (Before the Rain Starts)
This is your most important time frame. Hurricane season begins on June 1, and the rainy season usually starts in late May. Any preparations you make before then carry the most weight—because once rain becomes a frequent occurrence and storm activity increases, your options will be limited.
Consider the period from March to May as your annual review period. During this time, you should look for anything that has deteriorated over the past year and address it while the weather is still favorable.
| Homeowner tasks (safe to DIY) | Professional tasks (call a roofer) |
|---|---|
| Walk the perimeter, look up at the roofline from ground level for visible missing, lifted, or cracked tiles/shingles | Full professional roof inspection, have a licensed roofer assess the entire surface, flashings, and structure |
| Check gutters and downspouts for blockages, debris, and any sections that have pulled away from the fascia | Reseal all flashing points: chimney, skylights, vent pipes, wall junctions, and eave flashings |
| Clear any debris that has accumulated on the roof surface (fallen branches, leaves in valleys) | Check and rebed any loose ridge or hip tiles (mortar or foam adhesive); replace cracked tiles |
| Check the attic for water stains, damp insulation, or mold on the underside of the deck; a flashlight and 10 minutes is enough | Inspect and treat exposed fasteners for corrosion, especially within 3 miles of the coast |
| Confirm downspouts are directing water well away from the foundation | Check and clear all roof drains (flat/low-slope roofs) |
| Look at any visible flashing points from below; chimney base, skylights, vent boots, for obvious gaps or rust | Check attic ventilation; blocked soffit vents cause heat and moisture buildup that accelerates roof degradation from inside |
| Timing note:
Book your professional pre-season inspection in March or early April. By May, South Florida roofing contractors are at full capacity as homeowners prepare for storm season. Early booking means faster scheduling and more time to address anything found before the rain arrives. |
| Schedule your pre-season inspection now– or call (305) 697-6372 |
Rainy Season: June – September (Monitor and Respond Quickly)
This is not the time for major maintenance. Most of it should already be done. But it’s absolutely the time to stay attentive, because this is when problems that went undetected will announce themselves. A small vulnerability that posed no issue through the dry months will show up during a summer squall.
The job during rainy season is mostly observation and rapid response. If something shows up; a water stain on the ceiling, a damp smell in the attic, visible signs of intrusion, it needs to be addressed quickly. Water that gets into the structure during rainy season has months of humidity ahead of it. That’s how small leaks become mold problems. If you spot signs of a roof leak, contact us to understand what’s involved and what to do.
| Homeowner tasks (safe to DIY) | Professional tasks (call a roofer) |
|---|---|
| After heavy rain events, do a quick interior check: ceilings, upper walls, attic, look for new stains or damp patches | If a leak is detected: emergency tarp and assessment (don’t wait, water damage compounds quickly during the rainy season) |
| Check gutters monthly for blockages, rainy season debris accumulates fast | Post-storm inspection after any named tropical storm or wind event exceeding 50 mph |
| Keep an eye on any previous problem areas (prior repairs, older sections of roof) | Re-check any sealant work done in pre-season, if it was applied at the very end of the window |
| If you see granules accumulating in gutters after storms, note that significant granule loss means shingles are deteriorating | |
| Keep tree branches trimmed away from the roof; rainy season wind accelerates branch-drop damage |
| What counts as an emergency:
Active water coming through the ceiling or into light fixtures is an emergency; call immediately. A damp ceiling patch that appeared after rain is urgent but not immediate; call within 24 hours. A stain that was already there and hasn’t grown since the last rain; schedule an inspection within a week. |
Storm Season Response: After Any Named Storm
This section stands alone from the seasonal calendar because it’s triggered by events, not dates. Any time a named tropical storm or hurricane affects your area, even if it doesn’t make direct landfall, your roof needs to be looked at.
The reason is simple and worth repeating: wind damage often doesn’t look dramatic from the ground. A few lifted shingles that are still sitting in place. A small flashing separation that isn’t obvious until water finds it. A cracked tile that hasn’t shifted yet. These aren’t visible from street level, and they won’t cause a problem until the next heavy rain, which in South Florida could be the same afternoon.
| Homeowner tasks (safe to DIY) | Professional tasks (call a roofer) |
|---|---|
| Walk the perimeter from ground level. Look for obviously displaced tiles, missing shingles, or debris on the roof | Post-storm professional inspection, even if nothing is visibly wrong from the ground |
| Check the yard for any roofing material that may have blown off | Emergency tarping if an active breach is identified (we handle this) |
| Look at gutters from the ground; have they detached anywhere? | Damage documentation report for insurance claim purposes |
| Do an interior check immediately: ceilings, walls, attic for new stains or dampness | Flashing and fastener check: these are the most common storm-related failures |
| Photograph everything, dated photos are insurance claim evidence (see our insurance claims guide) | Ridge and hip tile re-bedding if displacement occurred |
| Do NOT climb onto the roof yourself, post-storm surfaces are slippery and may have unseen structural damage |

| Storm chaser warning:
After every major storm, unlicensed contractors flood South Florida. They take deposits, do substandard work, and leave. Before anyone goes on your roof after a storm, verify their Florida contractor license on the DBPR website. A legitimate contractor won’t object to you checking. |
Post-Season: October – November (Assess and Repair)
Hurricane season officially ends November 30, though meaningful storm activity typically winds down through October. This is your second major maintenance window, and it’s particularly valuable because any damage from the storm season is fresh, documented, and easier to address before the holidays arrive.
Think of post-season as your assessment and repair period. The pre-season inspection finds vulnerabilities before they’re tested. The post-season inspection finds what got through.
| Homeowner tasks (safe to DIY) | Professional tasks (call a roofer) |
|---|---|
| Clear gutters and downspouts of all storm-season debris; wet leaves in gutters over winter cause fascia rot | Post-season professional inspection, assess what the storm season did |
| Do a final interior check of attic, ceilings, and upper walls after the last rain events | Address any identified sealant or flashing repairs before the dry season |
| Trim back any tree branches that grew close to the roof during the summer growing season | Re-bed any loose ridge or hip tiles before winter dryness causes mortar to crack further |
| Check that gutter hangers are all still secure; storms stress the attachment points | Clean and inspect roof drains on flat/low-slope roofs before winter rains in December |
| If you haven’t already, note any areas where you saw water stains and flag them for the professional inspection | Wind mitigation inspection (if your roof was replaced or significantly repaired this year, it qualifies for insurance discounts) |
Dry Season: December – February (Lower Risk, Good for Repairs)
This is South Florida’s best opportunity for roofing work. During this period, rain is less frequent, humidity levels are lower, and there is no active storm threat.
If significant repairs or a full roof replacement were identified during the post-season inspection, now is an ideal time to complete that work. The weather is usually cooperative, contractors are available, and there is plenty of time before the next rainy season arrives.
Maintenance tasks for this quarter are lighter. The main focus is to keep the roof clean and free of debris while ensuring that any repairs from the previous year are still holding up. Additionally, this is a good time to plan for the pre-season inspection scheduled for March.
| Homeowner tasks (safe to DIY) | Professional tasks (call a roofer) |
|---|---|
| Check gutters after any December/January rain events; winter rain can still deposit debris | Carry out any non-urgent repairs identified at post-season inspection |
| Look for algae or moss growth on north-facing or shaded roof sections, address before it spreads | Full roof replacement if identified (optimal weather window for installation) |
| Clear any debris that has accumulated since post-season gutter clean | Algae or moss treatment on affected sections, professional application is more effective and longer-lasting than DIY |
| Book your March/April professional inspection now. Slots fill quickly as spring approaches | Re-caulk or reseal any penetrations where sealant is showing age |
What a Professional Maintenance Visit Actually Covers
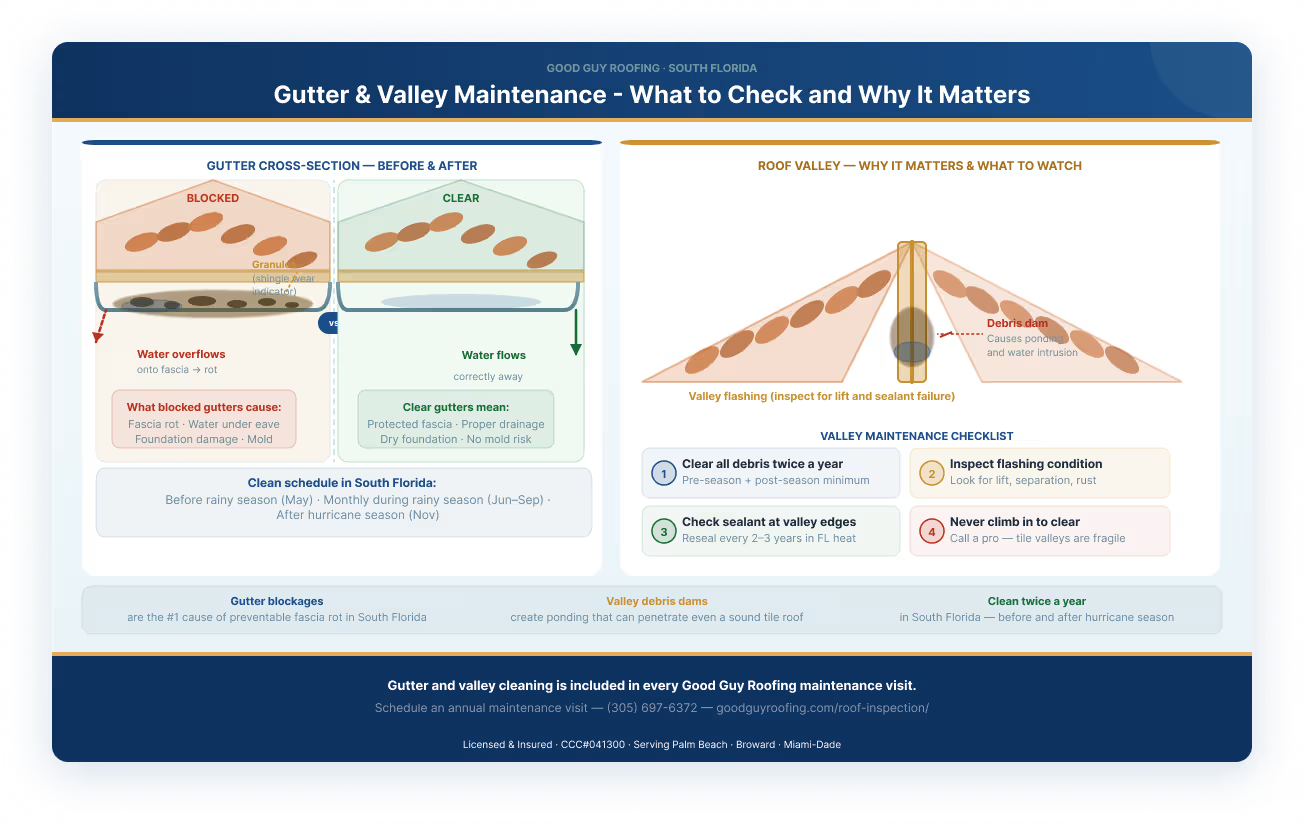
The checklists above distinguish between homeowner tasks and professional tasks, but it’s worth being more specific about what the professional side involves, because it’s not just a more thorough version of what you’d do yourself. A professional maintenance visit accesses things you simply can’t, and uses materials and techniques that hold up differently.
Sealant Inspection and Reapplication
Every penetration through the roof surface; vent pipes, exhaust fans, satellite dish mounts, and skylight edges is sealed where it meets the roofing material. Those sealants dry out, crack, and lose adhesion over time. In Florida’s UV intensity, this happens faster than most homeowners expect.
A professional maintenance visit involves inspecting every sealant point and reapplying where needed, using the correct product for the substrate, not hardware-store caulk applied to the wrong surface. This is one of the highest-value things a maintenance visit does, because failed sealants around penetrations are among the most common causes of residential roof leaks.
Flashing Assessment and Resetting
Flashing is the metal strip that seals the joints between the roof surface and vertical structures; chimneys, parapet walls, skylights, and where the roof meets a wall. Wind events cause flashing to lift or separate at the edges. Thermal cycling causes it to move slightly over time. A maintenance visit checks every flashing point and resets or reseals any that have shifted.
Fastener Condition
For shingle roofs, especially, fastener condition matters. Nails or screws that have backed out slightly, even by a millimeter or two, significantly compromise the shingle’s wind resistance. For coastal properties, corrosion of exposed fasteners is an additional concern. A professional inspection identifies these before they become vulnerabilities in the next storm.
Tile and Mortar Condition
On tile roofs, the mortar or foam adhesive that beds ridge and hip tiles degrades over time. Loose ridge tiles are one of the most common failure points in wind events; they’re the highest, most exposed element of the roof. A professional maintenance visit checks the bedding at every ridge and hip point and re-beds any that have shifted or lost adhesion.
Drainage Verification
A maintenance visit also verifies that water is moving the way it’s supposed to, off the surface, into the gutters, down the downspouts, and away from the foundation. This includes checking gutter pitch, downspout flow, and, for flat or low-slope roofs, clearing and checking roof drains. Blocked drainage is a leading cause of ponding water, which significantly accelerates roof deterioration.
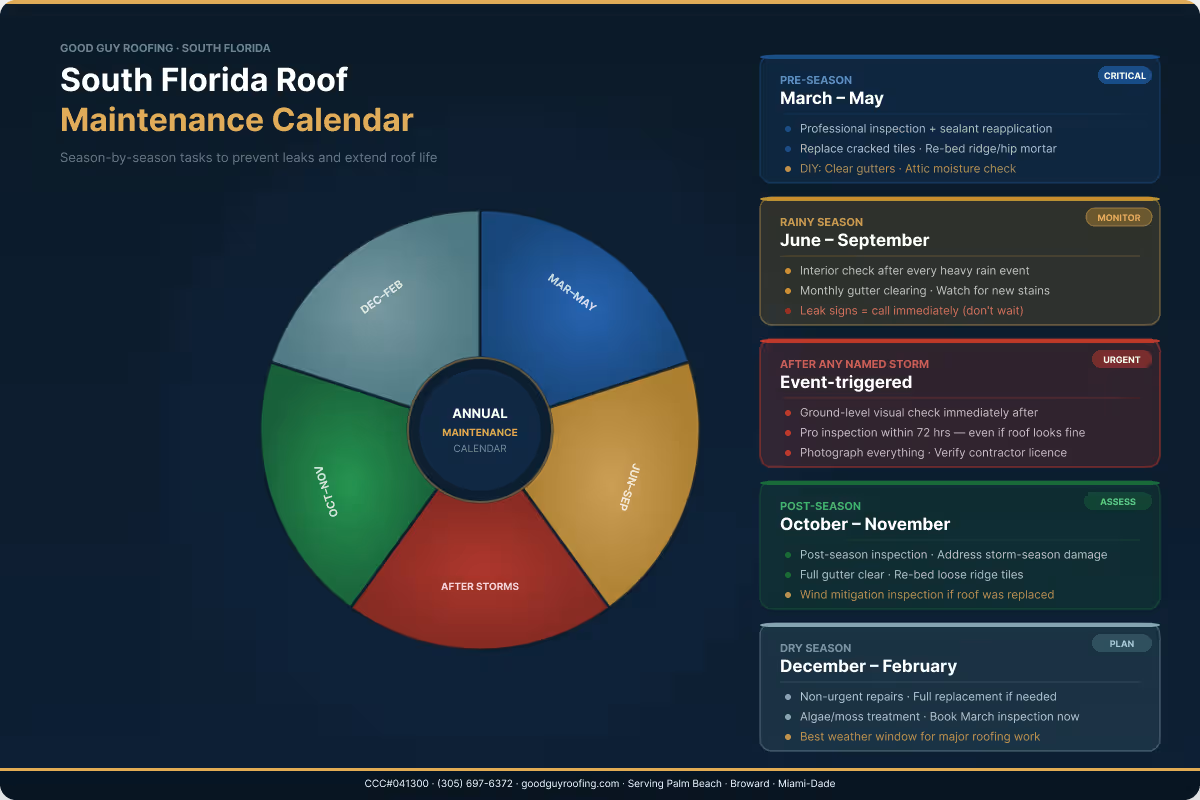
Quick Reference: South Florida Roof Maintenance Calendar
| March – May (Pre-Season):
Professional inspection. Reseal all flashings and penetrations. Replace damaged tiles/shingles. Clear gutters. Check attic. Schedule your roof inspection now; contractors fill up fast. June – September (Rainy Season): Interior checks after heavy rain. Monthly gutter clearing. Rapid response to any signs of intrusion. Post-storm inspection after named storms. After Any Named Storm: Ground-level visual check immediately. Professional inspection within 72 hours, regardless of what you can see. Document everything for insurance. October – November (Post-Season): Post-season professional inspection. Gutter clean. Repair work from the storm season. Wind mitigation inspection if applicable. December – February (Dry Season): Non-urgent repairs. Full replacements if needed. Book your March inspection. Algae/moss treatment on affected sections. |
Frequently Asked Questions
How often should I have my roof maintained?
For most South Florida homeowners, a professional maintenance visit once a year is the right baseline. Ideally, in March or April, before hurricane season opens. If your roof is older (15+ years for shingles, 30+ years for tile), or if you’ve had active storm activity, twice a year is a sensible cadence: pre-season and post-season. The ground-level DIY checks described in this guide should happen more frequently. A quick scan after any significant storm, and at least a gutter check before and after the rainy season.
Can roof maintenance actually extend the life of my roof?
Yes, consistently and meaningfully. The most common reason roofs in South Florida reach the end of their functional life before their rated lifespan is not storm damage. It’s the accumulation of small, unaddressed issues: sealants that failed and weren’t replaced, flashing that lifted in a storm and was never reset, and moisture that got into the structure through a minor penetration failure and sat there for two years. None of those things would have been expensive to fix in isolation. Together, they accelerate the deterioration of everything around them. A well-maintained roof regularly approaches the upper end of its rated lifespan. A neglected one often doesn’t make it halfway there.
What maintenance can homeowners safely do themselves?
Quite a bit, but with one firm rule: stay off the roof itself. Walking on a residential roof without roofing experience and proper footwear is genuinely dangerous, particularly on tile roofs (tiles are brittle underfoot) or after any moisture. Everything you can safely do from ground level or from a ladder at the roofline is fair game: visual scans of the roof surface, gutter clearing, interior attic checks, and ground-level documentation after storms. Beyond that, leave it to a professional. The money saved by doing your own flashing resealing is almost never worth the risk of doing it incorrectly or falling in the process.
Do tile roofs need maintenance? Aren’t they supposed to last forever?
Tile itself is remarkably durable; concrete and clay tiles can genuinely last 40 to 50 years in South Florida conditions. But the tile is only one part of the roof system, and the other parts don’t last that long without attention. The underlayment beneath the tile typically needs replacement every 20 to 25 years, regardless of how good the tile looks. The mortar bedding at ridges and hips degrades and needs periodic re-bedding. The flashings around penetrations need the same sealant maintenance as any other roof type. Tile roofs are low maintenance relative to shingles, but “low maintenance” is not the same as “no maintenance.” A tile roof that’s never been looked at in 25 years has almost certainly had its underlayment fail silently, and the tile above it won’t give you any warning.
What’s included in a professional maintenance visit from Good Guy Roofing?
Our maintenance visit covers the full roof system, not just the surface. That means: a complete inspection of all roofing material (tile, shingle, or metal, depending on your roof), every flashing and sealant point, gutters and downspouts, the attic space for signs of moisture or ventilation issues, and a structural visual check for any areas of concern. We reseal anything that needs it, re-bed any loose ridge or hip tiles, and flag anything requiring more significant repair. You receive a written report at the end: what we found, what we addressed on the visit, and what needs follow-up. If we find something that requires additional work, we’ll quote it separately before doing anything. The maintenance visit is not a sales conversation; it’s a maintenance visit.
Schedule a Roof Maintenance with Good Guy Roofing
Most roof problems don’t announce themselves until they’re expensive. The water stain on the ceiling, the sagging section, the leak that appears during a storm — by the time those show up, something has usually been wrong for a while. The entire point of a maintenance routine is to find things while they’re still small.
South Florida’s climate makes this more important than in most places. It’s also what makes it very manageable when you have a structure for it. Two professional visits a year, a few ground-level checks in between, and rapid response when a storm comes through. That’s the whole program.
If you’d like us to set up an annual maintenance plan for your property, or if you just want to book this year’s pre-season inspection, the next step is a quick call.